During our recent trip to Walt Disney World the kids (really all of us) throughly enjoyed pin trading. By the end of our trip everyone had a lanyard full of cherished trades and I wanted to find a way to keep the pins safe (they tend to fall off the lanyards), create a memento of the trip and provide a means for the boys to continue trading pins (more should arrive in the post today and I will be using them as encouragement rewards for a job well done ...).
Disney sells pin books for just under $50 that are of a nice quality, but we would have filled up one book and there wasn't a way to differentiate each page so the boys would know which page was their property. Thus, I used their pin book as a jumping off place and came up with my own version that incorporates the boy's assigned colors (each boy is assigned a color to keep track of cups, backpacks, notebooks, etc.)


Disney sells pin books for just under $50 that are of a nice quality, but we would have filled up one book and there wasn't a way to differentiate each page so the boys would know which page was their property. Thus, I used their pin book as a jumping off place and came up with my own version that incorporates the boy's assigned colors (each boy is assigned a color to keep track of cups, backpacks, notebooks, etc.)
Here is how I did it:

Supplies:
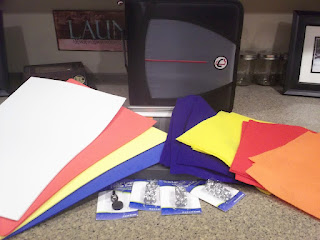
Zippered 3 ring binder, craft foam, craft felt, 1/4" large eyelets,
eyelet tool, silver permanent marker, ruler

First, I cut the foam to the size that would fit in the binder as pages. Here you could use a piece of cardstock or notebook paper as a template.

Secondly, I used notebook paper as a template to make the location for the eyelets, cut the holes using a single hole punch and placed the eyelets.

Next, I decided to add a grid to the foam pages. Not necessary and not on the original, but I like to keep things organized while allowing my kids to do it on their own. A grid gave the organization I carve with the freedom they earn. I started at the middle and added lines at roughly 1.5"

Here you can see the foam pages with the grid layered with the craft felt. The craft felt serves to protect the surface of the pins from scratches they may get from zippers and other pin's backs.

Finally, it was time to add the pin collections. As soon as the boys saw me adding their pins they wanted to start trading again. To trade with one another they simply remove the pages from the binder, make their trades and then put the pins and binder back together again.
Easy, breezy, DIY organized!
If you are wondering about the cost of this little project it was around $51 to create 2 books with 8 foam pages in each book (each page holds 40 pins). This should easily last the boys into adulthood or at the very least until this fad runs out.
I could have saved money by using standard 3 ring binders (the binders are $14 each!!), but I wanted the zippers to keep pins safe in the event that the backs come off and they slide off the page. I also considered using 2 pieces of craft felt sewn together (for stability and strength) and then sewing the grid lines as a means of further reinforcing the pages. Then instead of eyelets I would have probably sewn button holes to put the pages into the binder. With these fiscally minded changes that project could have easily dropped to $14 for 2 books.
I am buying trading books to have more idea on stocks and the trading itself. Nothing to lose!
ReplyDeleteTrading Books
So glad I came upon your blog. I didnt want to spend the amount it would cost for a pin book at the parks. It's so expensive when you have 3 kids to buy for. Your idea is a perfect alternative and still very pro-looking. I too need things to be orderly, but I wanted to let my kids add in their own pins. So drawing the grid lines (so smart!) was a fair compromise. I made 3, and they all love it.
ReplyDelete